
Steps for transmitting & Receiving data
Here are the steps to configure the UART0 to transmit/recive a byte of data for TI Tiva TM4C123GH6PM on the LaunchPad:
- Provide clock to UART0 by writing a 1 to RCGCUART (SYSCTL_RCGCUART_R) register.
- Provide clock to PORTA by writing a 1 to RCGCGPIO (SYSCTL_RCGCGPIO_R) register.
- Disable the UART0 by writing 0 to UARTCTL (UART0_CTL_R) register of UART0.
- Write the integer portion of the Baud rate to the UARTIBRD (UART0_IBRD_R) register of UART0.
- Write the fractional portion of the Baud rate to the UARTFBRD (UART0_FBRD_R) register of UART0.
- Configure the line control value for 1 stop bit, no FIFO, no interrupt, no parity, and 8-bit data size. That gives us 0x60 for the UARTLCRH (UART0_LCRH_R) register of UART0.
- Set UARTEN bit in UARTCTL (UART0_CTL_R) register to enable the UART0.
- Set TxE and RxE bits in UARTCTL register to enable the transmitter and receiver of UART0.
- Make PA0 and PA1 pins to be used as Digital I/O (GPIO_PORTA_DEN_R).
- Select the alternate functions of PA0 (RxD) and PA1 (TxD) pins using the GPIOAFSEL (GPIO_PORTA_AFSEL_R).
- Configure PA0 and PA1 pins for UART function (GPIO_PORTA_PCTL_R).
- Disable analog functionality on PortA0-1 (GPIO_PORTA_AMSEL_R)
- Monitor the RXFE flag bit in UART Flag register (UART0_FR_R) and when it goes LOW (buffer not empty), read the received byte from Data register (UART0_DR_R) and save it.
- Monitor the TXFF flag bit in UART Flag register (UART0_FR_R) and when it goes LOW (buffer not full), write received byte to Data register (UART0_DR_R) to be transmitted.
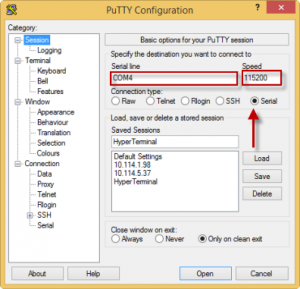
Before starting the UART echo program, we need a serial communication software in order to receive/transmit the data at the PC end, we can use putty software for this purpose, you can download it from here.
So just install it and run putty software, now click on “serial”, it will show COM1 in “serial line” and 9600 baud in the “speed” fields.

In order to get the COM Port Number of connected launchpad, launch device manager (PC), click on ports, “Stellaris Virtual Serial Port” will appear and so its COM Port number in brackets, here you will find the COM port number, in our case it is COM3. Just go to the putty and enter this COM port and select the speed as 115200.
Recent Comments