
I INTRODUCTION:
This project focuses on the development of a 2D platformer game designed to run on the TM4C123G microcontroller unit (MCU), interfaced with the BOOSTXL-K350QVG-S1 3.5â TFT touchscreen LCD. The objective was to create a com-plete interactive game featuring player movement, platform collision detection, coin collection, level transitions, and visual feedback such as game-over and victory screens. The project demonstrates efficient use of embedded system resources, par-ticularly in graphics rendering, user interaction, and memory management. The game is implemented across three levels with progressively increasing difficulty and diverse gameplay elements.
II PROJECT OBJECTIVE:
The primary goal of this project was to build a side-scrolling platformer game from scratch on a resource-constrained em-bedded platform. The key functional goals included:
• Smooth and responsive player control via touchscreen buttons (Left, Right, and Jump).
• Realistic gravity and collision mechanics.
• Multiple levels of gameplay, each with increasing com-plexity.
• Score tracking based on collectible coins.
• Differentiated end states such as âGame Overâ or âVictoryâ based on player performance.
• Optimized system resource usage, especially with respect to memory and display performance.
III GAME DESIGN AND LEVELS:
Level 1 serves as an introductory stage with basic plat- forms and obstacles. The goal is to navigate through simple terrain, encouraging familiarity with controls andphysics
Level 2 increases the complexity by including multiple collectible coins across the stage. The number of coins collected determines the player’s final score, which is dis- played when the game i completed. This level encour-ages exploration and careful navigation.
Level 3 introduces enhanced difficulty by using two differ-ent backgrounds, smaller platforms, and dangerous elements like fences. If the player touches a fence, the game terminates immediately, displaying a âGame Overâ screen. If all coins are successfully collected and the player reaches the final plat-form, a ”Victory” frame is shown. This level could not be inte- grated with the previous two in the same binary due to memory constraints and was implemented in a separate build.
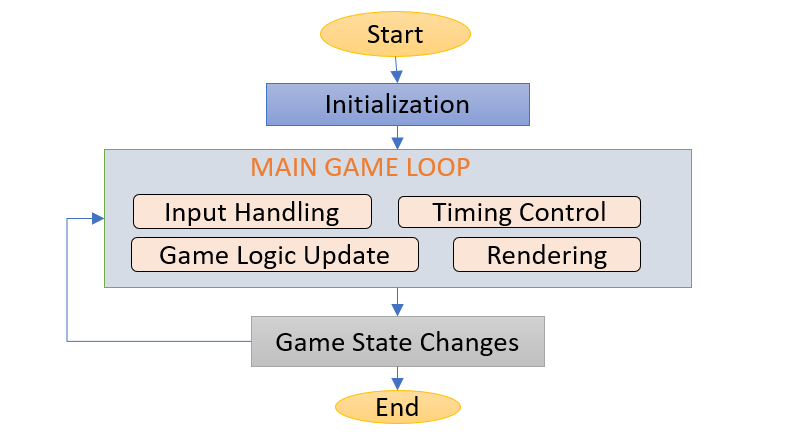
Figure 1: Platformer game flow chart
IV HARDWARE AND TOOLS USED
To interface the LCD with the Tiva board, it must be made sure that the zero ohm resistances R9 and R10 are removed by desoldering them as they short the ports B and D. Once the resistances are removed, the LCD could be directly plugged in on top of the Tiva board (It must be made sure that the J1, J2,J3, J4 on both LCD and launchpad board match).
4.1 Hardware components:
TM4C123GH6PM MCU – Main processor with Cortex- M4F core.
BOOSTXL-K350QVG-S1 LCD – 320×240 TFT display with touchscreen.
TSC2046 – Touch controller for the LCD (SPI communi-cation).
Kentec SSD2119 controller – Integrated on LCD Boost-erPack.
4.2 Software tools:
• Code Composer Studio (CCS) – Development and debug-ging environment.
• TivaWare SDK – Driver library for peripherals and graph-ics.
• GCC ARM Toolchain – Compiler.
• GIMP – Image editing tool for designing backgrounds and sprites.
4.3 Software Configurations:
Drivers for the LCD should be included in the working direc-tory along with the graphics library (grlib). The following are the drivers for interfacing LCD.
• Kentec320x240x16 ssd2119 spi.h
• touch.h
To display the required images on the LCD screen, the steps to be followed are:
1. Download and Install GIMP 2.0 (GNU Image Manipula-tion Program) on your computer.• Updating the player’s position, applying gravity, and de-tecting collisions.
2. Open GIMP and go to ’file–open’ and select the image to display.
3. Go to ’image–scale image’. Scale the image accordingly so that it fits in the display (which is 320X240).
4. Go to ’image–color–indexed’. Make it to indexed mode(from defaultRGB), choose 16 / 255 color palette on the next screen, and click apply.
5. Now export the image as a pnm file by ’file–export as–pnm image’.
6. Keep both xyz.pnm file and pnmtoc.exe file in the same folder and open the command prompt from that folder.
7. In cmd, type ’pnmtoc -c xyz.pnm xyz.c’. This will create the .c file containing the image and palette data.
NOTE: while entering the above command, ensure the current working directory is the same as the one you kept(xyz.pnm and pnmtoc.exe) files.
8. Now the image data can be copied from the .c file created and used in thecode by changing the name of the constant array and using the ’GrImageDraw’ function
4.4 Libraries and Drivers:
The game utilizes a range of libraries and drivers provided by TivaWare and custom implementations:
• SPI Driver – For communication with the LCD and touch controller
• Graphics Library (grlib) – For rendering shapes, images, and widgets.
• Touchscreen Driver – For polling and processing user touch inputs.
• uDMA (Micro Direct Memory Access) – Used for effi-cient image transfers.
• SysTick Timer – For time-based events such as gravity and game logic updates.
• EEPROM Interface (planned) – Intended for future sup- port of game save/load functionality.
V SYSTEM ARCHITECTURE:
The game architecture is split into modular components:
5.1 CPU Responsibilities:
The CPU handles core logic such as:
• Interpreting touch inputs.
• Updating the player’s position, applying gravity, and de-tecting collisions.
• Managing level transitions and score display logic.
5.2 DMA Integration:
To reduce CPU load and eliminate flickering during image ren-dering, the game uses the uDMA controller to transfer back- ground frames directly to the LCD controller.
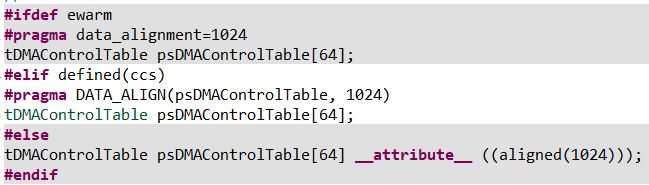
The DMA controller is configured with a 1024-byte aligned control table, which is required for proper operation across dif-ferent compilers. This is achieved using compiler-specific pre- processor conditions:
5.3 Code:
Displaying backgrounds: The game consists of three back-grounds to be displayed on the LCD which are,
1. Menu screen
2. Levels
3. Victory Screen
For each of them, image arrays are saved in ’images.c’ file and a Canvas widget is defined for displaying.
All the widgets have pointers assigned to them and once the widget is added using the WidgetAdd function, the function
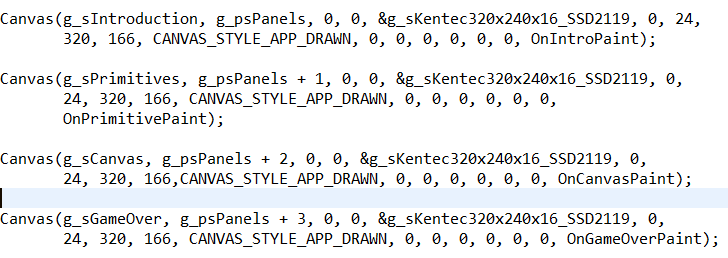
given in the widget definition is executed.
For example, when the introduction canvas is added, OnIntroPaint function is executed.

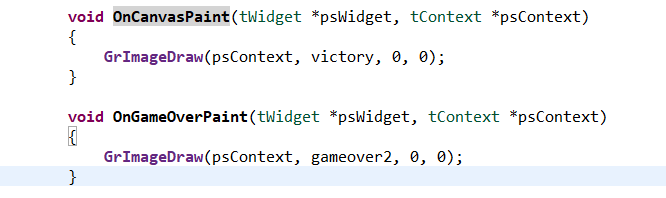
This is the function for OnIntroPaint which draws the im-age on the widget. Similarly, the function OnCanvasPaint is defined as follows for displaying victory.
5.3.1 Moving the playable character:
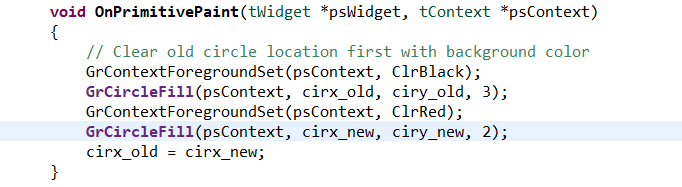
The playable character in this game is a red ball. The ball has a 5-pixel radius and can be placed using the x and y co- ordinates defined for it. When the ball moves, its old position is repainted in the background color, and the new position is painted red. The code snippet for this is given below
5.3.2 Key collection and victory:
Once the ball reaches the key, a flag is set to 1 to represent the key collected and the key comes to inventory. Using this flag, the image displayed is changed to the one with the key in the inventory. If the ball reaches the endpoint without the key, the level will not be completed. With the key, once the ball reaches the endpoint, the panel number is incremented, the next Canvas widget is added, and the victory screen is displayed.
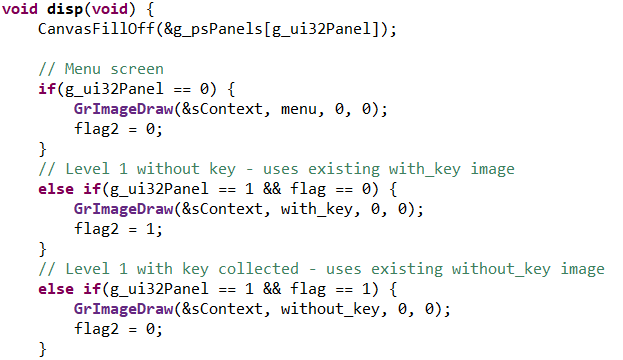
5.3.3 Partial pixel control:
While in the level, when the ball is moved, only the pixels
where the ball is present are updated instead of the entire
screen. This is achieved using the disp() function. The disp() function is given as follows.
The canvas fill is off and a constant background is filled
5.4 SysTick Timer:
The SysTick Handler is critical in this game, as it provides a consistent update rate for game physics and rendering. This in-cludes falling acceleration (gravity), updating the characterâs state, and refreshing the screen at a controlled rate to avoid timing inconsistencies.
VI TECHNICAL CHALLENGES:
Several technical hurdles were encountered during develop-ment:
• Memory Limitations: The most significant issue was the limited flash and RAM available on the TM4C123G.While Levels 1 and 2 could be integrated, adding Level
3 resulted in compilation errors due to insufficient mem-ory. This required separating Level 3 into a standalone program.
• LCD Flickering: During background updates, flickering occurred due to slow SPI transfers. The problem was mit-igated by using DMA for background rendering.
• Collision Detection: Platform collision logic had to be carefully refined to handle edge cases like jumping, falling through gaps, and touching hazards such as fences.
• Touch Sensitivity: Raw input from the touchscreen re- quired filtering and calibration for reliable control re-sponse.
VII RESULTS AND OBSERVATIONS:
Despite hardware limitations, the game functions smoothly across all implemented levels. The integration of graphics, physics, and user input works as intended, and the transitions between game states are handled efficiently. The score tracking in Level 2 and the differentiated outcomes in Level 3(Game Over/Victory) enhance the player experience. The use of DMA significantly improved rendering perfor-
mance, and the game’s responsiveness was acceptable for the intended platform. The modular design also allows future up-grades, such as loading levels from external storage or EEP-ROM.
VIII FUTURE ENHANCEMENTS:
Future improvements to this project can include:
• Integration of all levels using external flash or SD card storage.
• Addition of sound effects using PWM or DAC.
• Enhanced game elements such as enemies with basic AI.
• EEPROM-based save/load feature for game state reten-tion.
• Timed scoring system or dynamic difficulty adjustment.
IX CONCLUSION:
This mini-project demonstrated the feasibility of developing a feature-rich game on an embedded platform with limited re- sources. The platformer game successfully combined user in-terface design, real-time game logic, and memory optimiza- tion. It was a valuable learning experience in handling low- level hardware control, peripheral communication, and graph- ical rendering using embedded C. The results highlight the po- tential of embedded systems for interactive applications be-yond traditional control systems.
Recent Comments