
1. Introduction
Welcome to the documentation for the “Jumpy game”. This document provides a
comprehensive guide to understanding and using the game.
The purpose of the game is to recreate the experience of the popular dinosaur game found
in the Google Chrome browser and to make the game more engaging by introducing some extra
features. It is designed to provide an enjoyable gaming experience for players of all ages. The
game utilizes the Tiva-C series TM4C123GXL microcontroller launchpad to handle the game
logic and a Hitachi HD44780 16×2 LCD to provide the visual interface. For demonstration
purposes, we have used the EduARM4 board to interface the Tiva launchpad with the LCD
display.
2. Game Overview
Game objective:
The Jumpy game is an endless runner-style game, where the player controls a character
(smiley) and tries to avoid obstacles (cactus) and collect the flying dollars ($) by jumping to
achieve the highest possible score. The objective is to survive as long as possible by jumping
over the cacti and score extra points by collecting the dollars flying over by jumping up.
Game control:
The player interacts with the game by using a push button (SW1) connected to the
microcontroller. Press the switch to start the game. During the game, every switch press triggers
a jump action. When the switch is pressed, the ‘smiley’ jumps up and becomes ‘nervous’ before
it comes down to the ‘smile’ state automatically. The ‘smiley’ moves automatically, and the
player’s input determines the instant of the jump of the ‘smiley’.
Obstacles and rewards:
The game includes obstacles in the form of cacti and rewards in the form of flying dollars,
which appear almost randomly as the game progresses. The player must time their jumps
accurately to avoid colliding with these cacti and collect the dollars. As the game progresses,
the difficulty level increases as the speed of the run increases, making it more challenging for
the player to avoid the cacti and achieve higher scores.
Score:
The game continuously keeps track of the player’s score, which is based on the distance
covered, the number of cacti avoided and the number of dollars successfully collected. At the
start of the game, each cactus skip gives 1 point whereas each collected dollar gives 5 points.
However, as the game progresses and game speed increases reward points for the same also
scale up ensuring you score more at difficult levels. Due to the limitation of gameplay using
LCD display, we have set an upper limit of speed in the game beyond which (if you reach there)
the game will not become fast with each jump as it was during the start.
Highest Score:
The highest score so far is available at the end of the game. This highest score data is stored in
the EEPROM and hence the data is available even if you switch off the board. If you excel the
highest score stored, the new score is automatically updated with an LCD message. If you want
to clear the already stored highest score from the memory, just press the same switch once after
the game is over. It will clear the memory and the new score in the next run will be stored as
the highest score.
That’s it. Happy Jumpy!
3. Hardware Setup
To set up the game, you will need the following components:
TM4C123GH6XL Launchpad (or similar microcontroller)
Hitachi HD4480 16×2 LCD display (or similar LCD)
Wires and breadboard for connections
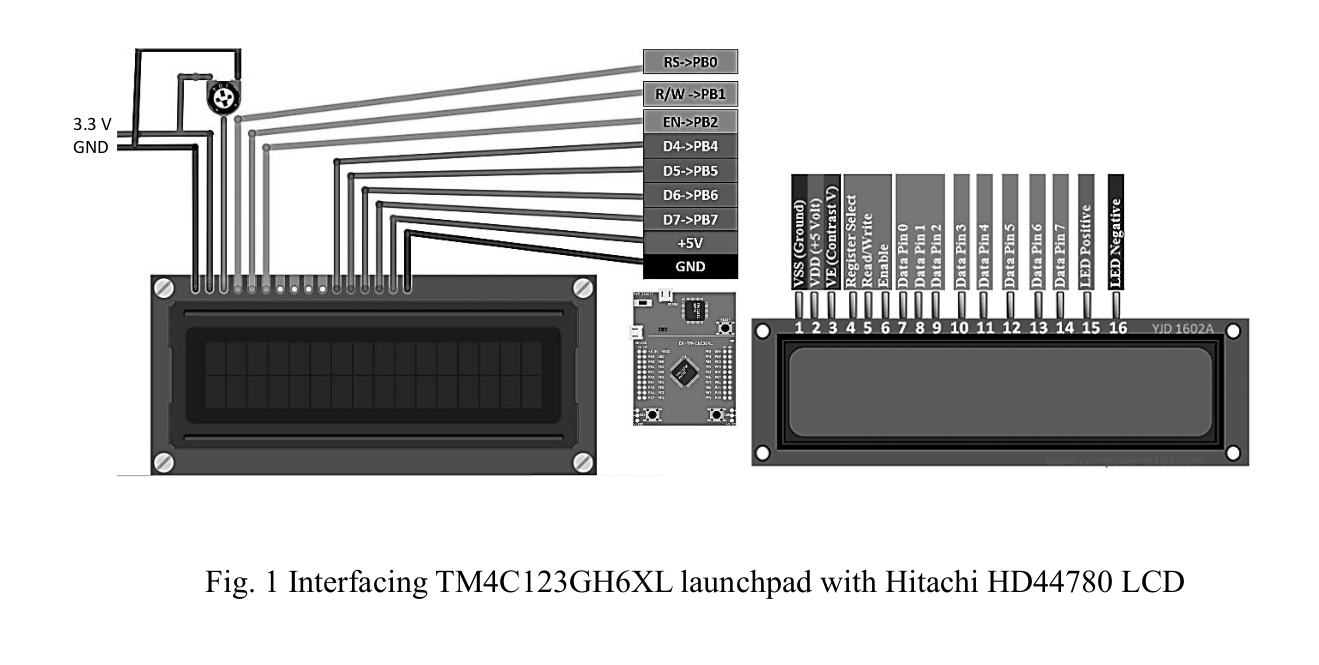
For a demonstration of this project, we have used the EduARM4 board where the available
default connections have been used to interface the Tiva board with the LCD by shorting J5 (3
and 4). If you want to use the microcontroller and the LCD separately, the pin configurations
and connections are given in Fig. 1. The LCD works well with a 3.3 V supply from the
microcontroller, so no separate battery is required. Consult the microcontroller’s datasheet for
pin configurations and ensure the connections are made correctly. Use a breadboard or a
prototyping board to create a stable setup.
4. Software Architecture
The game’s software is structured into several components that work together to create the
game experience. The main flow of the software algorithm includes:
i.Initialization: Initializes the microcontroller, and LCD display, and configures
required peripherals (GPIO PORT A and B for LCD, PORT F for Switch1 detection,
SysTick for controlling moving display, LCD configuration).
GPIO_init();
Systick_init();
LCD_init();
ii.Custom characters: Custom LCD characters like ‘cactus’, ‘smile’, ‘nervous’ and
‘sad’ are defined at specific positions in SGRAM (locations 0x40 to 0x58 i.e. 32
bytes to store 4 characters each in a 5×8 matrix).
Custom_char_init();
iii.Welcome message: The welcome message is displayed on the LCD until the first
switch press is detected.
welcome_msg();
iv.Game start: As the first switch is detected the ready message is displayed first and
then the smiley arrives at its position.
ready_msg();
smile_init(); // start with smile state
v.Game loop: Controls the flow of the game by repeatedly updating the game state,
detecting user input, and rendering the game graphics on the LCD display.
// if switch is detected,
go_up(); // jump to nervous state
// increment score if cactus skipped by checking loc
// if dollar collected by checking dol_loc
collect_dollar();
// increment score for each dollar
go_down(); // come back to smile state
print_score(); // display score at the right of top panel
increase_speed(); // increase speed by reducing reload value of Systick
// timer with each cactus skipped
// else (switch not detected)
//Check for location value to detect collision
collision();
// goes to sad state if collision detected
break;
// comes out of the game loop if collision occurs,
// else continue in the same game loop
vi.Calculate the highest score: Each time the control comes out of the game loop it
updates the highest score in the EEPROM.
vii.Display game over: The LCD displays the game over message and the present as
well as the highest score.
viii.Clear highest score memory: This is an additional feature. If the user wants to
reset the highest score value in the EEPROM, he will press the same switch once
after the game over message is displayed.
// if switch press detected after game over
Clear_memory();
// End of main function
For using the EEPROM we need to add separate header files and library as mentioned in the
attached code.
5. Future prospectives
•
Modify the game to add new features or customize the gameplay.
Based on user requirements, the game can be modified to develop more engaging gameplay.
The already developed code serves as a starting point, and we can add new features, tweak
gameplay mechanics, or enhance the graphics.
•
Connect additional peripherals or sensors to the game.
We can interface sensitive infrared sensors with the microcontroller to detect physical hand
movements and use this signal to trigger the jump movement. This will contribute to more
engaging gameplay.
Also, the 16×2 LCD can be replaced with an OLED display to include and display extra
features to the game.
•
Optimize the game for better performance.
There may be bottlenecks in the code that may be causing slowdowns and glitches. To avoid
this the critical sections of the code can be optimized using efficient algorithms for collision
detection and rendering, and minimize unnecessary calculations or iterations. Additionally,
proper memory management needs to be ensured to avoid memory leaks or excessive memory
usage.
6. References
[1] Tiva™ TM4C123GH6PM Microcontroller DATA SHEET
[2] Hitachi HD44780U (LCD-II) DATA SHEET
Code:Code_files
Demo: demovideo
Recent Comments