
$ mkdir ~/bbb_buildroot
$ cd ~/bbb_buildroot
Install ARM Toolchain
$ wget -c https://armkeil.blob.core.windows.net/developer/Files/downloads/gnu-a/8.3-2019.03/binrel/gcc-arm-8.3-2019.03-x86_64-arm-linux-gnueabihf.tar.xz
$ sudo tar xf ./gcc-arm-8.3-2019.03-x86_64-arm-linux-gnueabihf.tar.xz -C /opt/
To use xconfig
$ sudo apt-get install libqt4-dev pkg-config
To use gconfig
$ sudo apt-get install gir1.2-gtk-2.0 libglade2-dev libcanberra-gtk-module
Initial configuration and build
Our first step to get started with Buildroot is obviously to build a minimal Linux system, with just a bootloader, Linux kernel and simple user-space.
The Buildroot at buildroot provides a ready-to-use defconfig for the BeagleBone Black platform. However, for educational purposes, we are going to start straight from the official Buildroot, and build our configuration from beaglebone_defconfig.
Getting Buildroot
Start by cloning Buildroot’s official Git repository:
$ git clone https://git.busybox.net/buildroot/
$ cd buildroot/
$ git checkout 2019.08 -b 2019.08
$ make beaglebone_defconfig
Modifying default configuration
Now it’s time to start modifying our configuration:
$ make menuconfig
In the configuration, we’ll have to customize a number of options, as detailed below. Of course, take this opportunity to navigate in all the options, and discover what Buildroot can do.
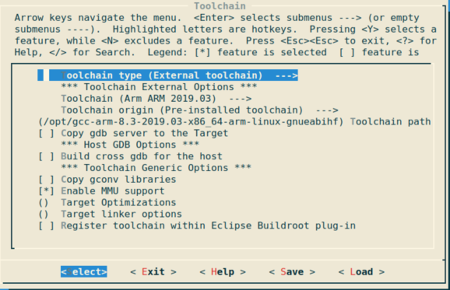
- In Toolchain
- Change Toolchain type to External toolchain. By default, Buildroot builds its own toolchain, but it can also use pre-built external toolchains. We’ll use the latter, in order to save build time. Since we’ve selected an ARM platform, a ARM toolchain is automatically selected, which will work for us.
Toolchain --->
    Toolchain type (External toolchain)  --->
       (X) External toolchain
    *** Toolchain External Options ***
         (X) Arm ARM 2019.03
    Toolchain origin (Pre-installed toolchain)  --->
       (X) Pre-installed toolchain
       Toolchain path
           /opt/gcc-arm-8.3-2019.03-x86_64-arm-linux-gnueabihf
- In System configuration
- In System configuration, you can customize the System host name, System banner and root password if you wish. Keep the default values for the rest.
- In Kernel
Kernel  --->
    (X) Custom Git repository
    URL of custom repository
        https://github.com/beagleboard/linux.git
    Custom repository version
        4.9-rt
    Kernel configuration
        (X) Use the architecture default configuration
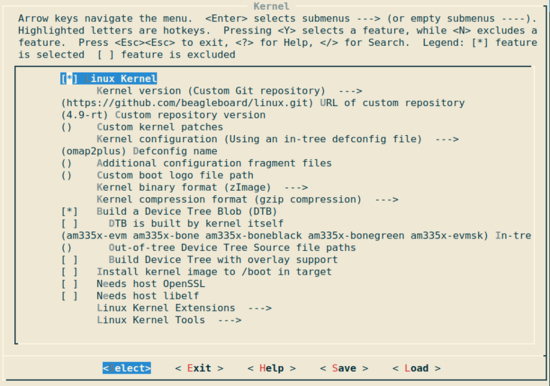
Keep the default values for the rest.
Running the build
To start the build, you can run just make.
$ make
The build will take a while (about 20-45 minutes). At the end of the build, the output is located in output/images. We have:
- MLO, the first stage bootloader
- u-boot.img, the second stage bootloader
- zImage, the Linux kernel image
- am335x-boneblack.dtb, the Linux kernel Device Tree Blob
- rootfs.ext4, the root filesystem image, and
- sdcard.img, ready for flashing.
Setup microSD card
Plug in your removable flash drive and run the lsblk command to identify the device. Here is the output of the ‘lsblk’ command on my system where ‘sdb’ is the removable flash storage:
NAME   MAJ:MIN RM  SIZE  RO TYPE MOUNTPOINT
sdb    8:16    1   7.4G  0  disk
├─sdb1 8:17    1   16M   0  part /media/jshankar/4F75-58E3
└─sdb2 8:18    1   512M  0  part /media/jshankar/dfbb4848-2a5a-4d0c-85c2-4575ae64daa5
There are many command line tools to do the job, we will use parted utility for this tutorial. Run the parted command with the name of the block device that you want to format. In this case, it’s sdb. (Be careful with the name of the block device because you might end up formatting the wrong drive.)
Exchange sdb with the name of your block device in the following command:
$ sudo parted /dev/sdb
It will ask you to enter the password for the user and you will notice that parted replaces the username and $ sign, which means you are running the parted utility. First, let’s create a partition table. In this case, we are using MBR:
(parted) mklabel msdos
Once the partition table is created, you can create partitions on the drive. We will be creating just one partition:
(parted) mkpart primary ext2 1MiB 100%
Then set the boot flag on it:
(parted) set 1 boot on
Exit the parted tool:
(parted) quit
Now format it as ext2:
sudo mkfs.ext2 /dev/sdb1
Copy Kernel Image
$ sudo dd if=./output/images/sdcard.img of=/dev/sdb bs=1M
Networking
$ sudo mount /dev/sdb2 /mnt
Edit: /mnt/etc/network/interfaces
$ sudo nano /mnt/etc/network/interfaces
Add:
# Configure Loopback
auto lo
iface lo inet loopback
#automatically start eth0, with dhcp
auto eth0
iface eth0 inet dhcp
Remove microSD/SD card
$ sync
$ sudo umount /mnt
Insert the SD card in the BeagleBone board. Press and Hold the Boot button (S2) and power it up. Provided you have a serial port connection at 115200 bps, you should see the system booting.
There is still plenty of work to do in our embedded system, but you’ve got the process uncovered.
Recent Comments