
Objective
The objective of this project is to transfer binary file (.bin) over UART (universal asynchronous receiver/transmitter) using FIFO. It should be capable for serial communication between two devices. We will use busy-wait to synchronize the software with the hardware.
- We will be sending a binary file from our host terminal to the microcontroller using Python application based GUI.
- Store it in memory and display it using TExaS Nokia 5110 screen.
- And finally, echoing it back to the host PC.
NOTE: Due to unavailability of the board, this project was implemented only through Simulation in Keil µVision 5 Tool. We have made use of a virtual COM port driver in order to communicate between our 2 applications (Python and Keil) by assigning them to 2 separate COM ports.
UART FIFO
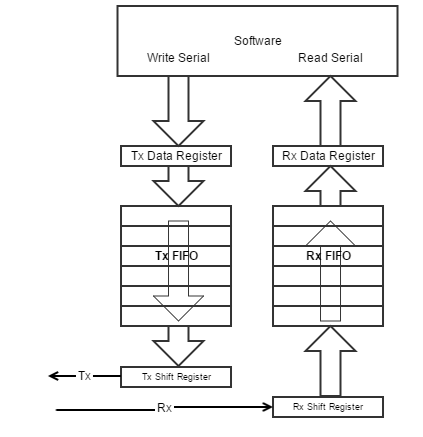
UART have dedicated memory in the form of a FIFO structure on both transmit and receive side. The transmit FIFO is used to hold the data to be written to the serial port and the receive FIFO is used to hold the data received by the serial port.
Need for FIFO
When we use a 1 byte buffer, every time a byte is sent or received, the CPU gets a UART interrupt. The CPU then transfers the byte from the UART buffer to the memory, or writes the buffer with the next byte to send. Thus, every time a byte is sent or received, the CPU is interrupted. This kind of makes the CPU busy handling the UART only and not do other tasks. For e.g., it might happen that the CPU misses reading the data and a new data comes and overwrites, thereby we lose our previous data. Thus, the concept of FIFO comes into the picture. The FIFO can receive upto 16 bytes of data and then interrupt the CPU. CPU can then transfer these bytes together at its own speed. The CPU hence receives less interrupts and is free to do other things. Data is rarely lost. We can even set up a threshold known as trigger level to notify CPU when the level of FIFO passes the threshold.
FIFO Buffer
(Source: [1])
FIFO Buffer has different size in different devices.TI Tiva UART has an internal 16-byte FIFO (first in first out) buffer to store data for transmission. There is also another 16-byte FIFO buffer to save all the received bytes. By enabling FEN bit of UART Line Control register, we can write upto 16 bytes of data block into data buffer. As we were not able to implement interrupts on KEIL, we simply used the polling method to poll the TxFIFO and RxFIFO flag described as below.
- At Transmission side, one can write data into UART Data Register (e.g. UART0_DR) by using software code. These 8 bits of data from Data Register is passed to Tx FIFO Buffer. After that, the data is sent out(one at a time) from Tx Shift Register.
- TxFIFO flag = 1 (Buffer full – Can’t accept more data)
- TxFIFO flag = 0 (Buffer not full – Software can write to Data Register)
- At Receiver end, there is Rx FIFO Buffer.
- RxFIFO Empty flag = 1 (Buffer is empty)
- RxFIFO Empty flag = 0 (Buffer has data to be read)
Project Description
- Data is send through UART GUI window created using python code using the python Tkinter library. We have used the pyserial library of python which performs serial read and write from the host terminal.
- Data is received by the Microcontroller – Tm4c123g6hpm (simulated in Keil software).
- These receiver and sender applications are connected through Virtual Serial Port Diver and communication happen through UART.
- We are using TExaS Nokia 5110 screen on keil to display image which is created by using the received data of binary file from external device.
Virtual COM port Driver
Due to unavailability of the board, we were implementing the program using Keil Simulator. But as the python application was also running on the same PC, our challenge was how to make these applications interact i.e. how to perform serial transmission between two applications running on the same PC.
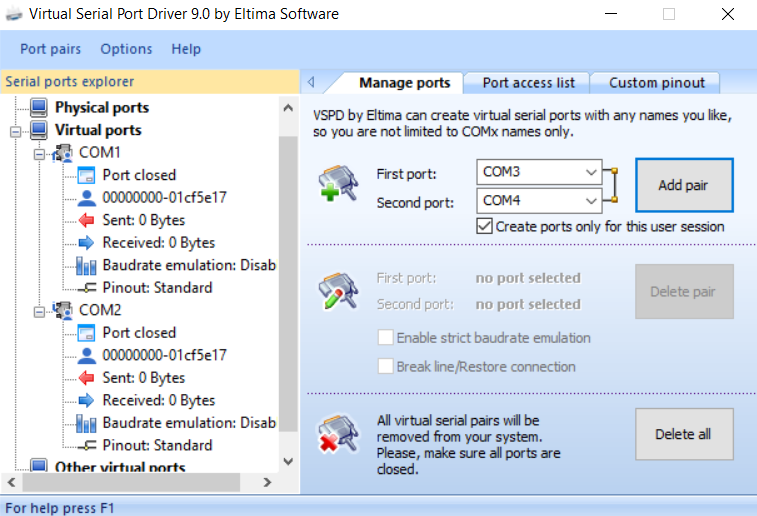
For that, we have used Eltima Software, which is a virtual COM port driver. This software creates virtual serial port pairs, i.e. it creates a Virtual null-modem connection between the two. We have assigned COM1 port to our Keil application and COM2 port to our python application, both running parallelly.
In this way, both our applications were able to communicate with each other.
KEIL Debug Commands and VTREG
In the Keil command window we can give debug commands and interact using virtual registers. Debugger Initialization File with extension .ini can also be used to give these commands and can be included before debugging. The UART VTREG or Virtual Registers are serial input and output registers of UART. They basically represent the serial data going into and coming out of our serial channel. For UART0, the UART0_IN register is used to give input and UART0_OUT register represents the UART0 output.
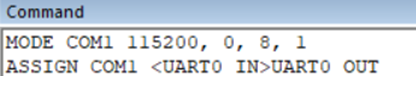
- We have used ASSIGN command using which we can assign the serial input and output registers to a COM port. Keil will redirect the data in the serial registers as if its coming into and out of a COM port.
- Using MODE command, we can set the COM port number, baud rate, parity, data bits and stop bits specifications etc.
- COM port = COM1
- Baud Rate = 115200 bps
- Parity = 0
- Databits = 8
- Stop bits = 1
Host PC Application
We can use some of the available terminal emulators such as Putty, RealTerm, HytperTerminal etc. But many of these do not support file transfer option. We initially communicated using RealTerm serial terminal which has option for sending files also. But in order to make our transfer process more user friendly, we have developed our own python application which runs a Graphical User Interface. Instead of working on terminal using commands, we can make a GUI to better control and manipulate our transfer process.
In python, we have made use of pySerial library which provides access to serial ports. It provides support for different byte sizes, stop bits, parity and flow control with RTS/CTS and/or Xon/Xoff. We can use serial read and serial write commands to receive and send the file through that particular serial port. The port is set up for binary transmission.
UART Graphical User Interface
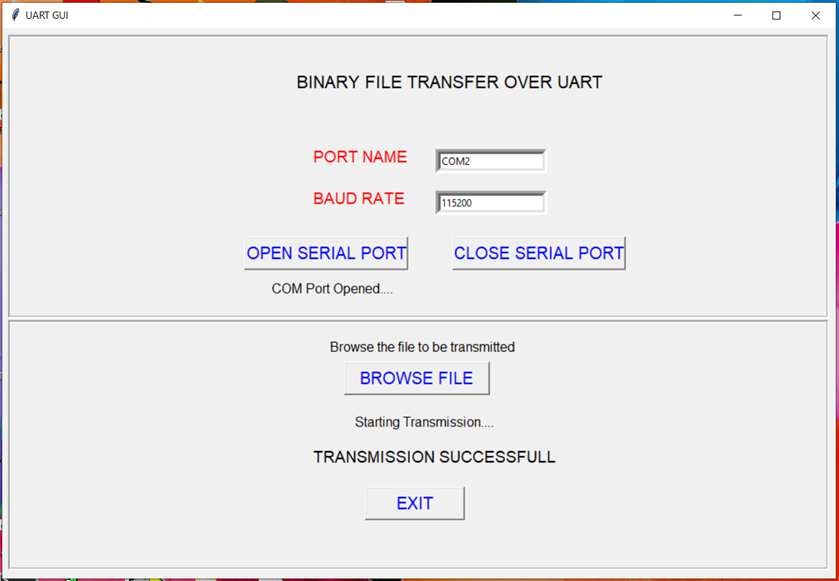
We have made an interactive GUI using python tkinter package, to make our application more user friendly.
1) We have to first assign Port name and Baudrate to activate the COM port for serial. Other parameters remain at their default value.
2) Then Click on Open COM port. That COM port is opened.
3) Next, we browse the file, and send from the laptop.
4) We also receive back an echo of the same file from KEIL which we store in a new file.
5) After complete transmission, we receive a message TRANSMISSION SUCCESSFUL.
Thus, we are doing 2 way transmission.
Simulator Output
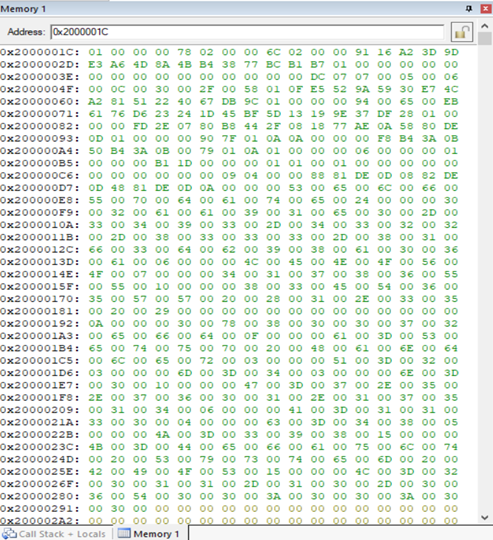
The binary file received from UART is stored in memory. Above image shows the Hex value of binary file stored in memory of controller.
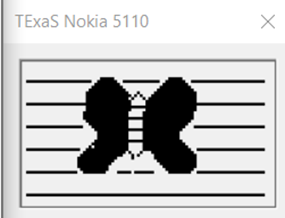
TExaS Nokia 5110 screen peripheral is used to display the image which is created by using the received data of binary file from external device. The data read from the binary file will act as a 1-bit pixel for Nokia screen.
Software Tools
- Simulation Platform:
- Keil µVision5 Microcontroller Development Kit (MDK Version 5) by ARM
- Python
- Virtual COM port connector:
- Eltima Software – Virtual Serial Port Driver
References
- Tiva™ TM4C123GH6PM Microcontroller DATASHEET SPMS376E
- KEIL Virtual Simulation Registers (VTREG): http://www.keil.com/support/man/docs/uv4/uv4_sm_can_commvtreg.htm
- KEIL Debug Commands: http://www.keil.com/support/man/docs/uv4/uv4_debug_commands.htm
- Eltima Software: https://www.eltima.com/products/vspdxp/
Recent Comments