
This page describes the project Interfacing Thermal printer with STM32 board & Implementing tprint (text print command) in UART console command program ,which is a part of Embedded Systems-I course.The aim of this project is to interface APS (EPM 203LV) thermal printer with STM32L-DISCOVERY board & give data ,which we want to print, to STM32L-DISCOVERY board serially from our PC by connecting UART and using GTK-TERM(hyperterminal).
PRINTER OVERVIEW:
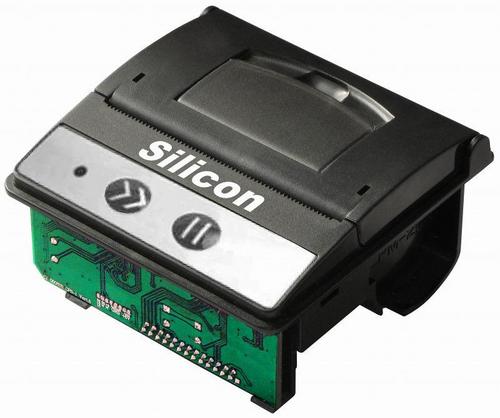
PRINTER FEATURES:
 ->Small industry compatible size.
 ->Ultra compact bucket printer.
 ->2 inch paper width.
 ->Character per line:24 or 32.
 ->Programmable speed upto 50 mm/sec.
 ->Universal ESC sequence compatible.
 ->Complete text and graphic printing.
 ->Inbuild over temperature & voltage protection.
 ->Serial interface.
FUNCTIONS SUPPORTED:
 ->Graphics printing.
 ->Head tempreature protection and error indication by LED.
 ->Head Voltage protection.
 ->Error indications:
 -Paper out(continious RED LED).
 -Head temperature high(blinking RED LED).
 ->Selectable Economy and Normal mode by shorting the S3 register on the board.
TECHNICAL & ELECTRIC SPECIFICATION
Technical_&_Elecrical_Specification
SUPPORTED COMMAND SET\
HOW TO DO THIS PROJECT
ELECTRICAL CONNECTIONS
->power STM32L-DISCOVERY board from PC by keeping it connected to PC's USB port.
->connect UART to the USB port & connect RS-232 to ttl logic convertor to the UART, connect its VCC & GND to the board.
->connect the TX of the UART(after ttl logic conversion) to the board's UART(UART1 here) RX(here PIN b7 is configured as RX).
->connect the thermal printer to the mains using a adapter which has high current rating(SPARTAN-6 board's adapter used in FPGA lab will do).
->connect RX of the thermal printer to the TX(here pin b6 is configured as TX) of the board.

PROCEDURE
step1.
GETTING DATA OUT SERIALLY FROM PC:
 ->For this install GTKTERM from ubuntu software centre in your pc.
 ->Goto 'dev' directory and use 'chmod' command to make UART(ttyUSB_) writable(chmod 777,will do).
 ->open GTKTERM ,select 'configuration',there select 'port',then from there select your ttyUSB_(which has been assigned to ur UART).
 ->select Baud rate-9600,8-bit,1stop-bit,no parity.
step2.
    USE THIS HEADER FILE.
     Thermalprinter
     USE THIS MAIN PROGRAM IN UR ECLIPSE PROJECT.
     Projectthermalprinter
     burn the code in the board.
step3.
   SENDING DATA INTO STM32L-DISCOVERY BOARD TO THE THERMAL PRINTER:
   ->print("whatever u want to print",mode) this is command you have to use(to write) in the the GTKTERM to print your data.
   ->in the mode field write:
      0 for 32 char Normal.
      1 for 24 char Normal.
      8 for 32 char BOLD.
      9 for 24 char BOLD.
PROBLEMS FACED
1.This printer was not printing the character whose ascii value it was getting at its input,experimently we found that:
  -To print a character of ascii value 'x' we have to send-> (255-2*x),if x is greater than 63,& (254-4*x) if x is less than 64. This thing we took care in the program.
2.If there is no delay between commands & data then data is not printed properly, so we put some delay appropriately.
3.Also we put some delay to print character whose ascii value is below 64,to make it work properly.
TEAM MEMBERS
- Amit Saluja(amit.saluja@dese.iisc.ernet.in)
- P SAthish(sathish@cedt.iisc.ernet.in)
UPDATES (on 11-04-2014)
 Printing Logo :
 ->To print the logo send the following command:
     - ESC #
     - In Hex value <C9h><B9h><row length in hex><column length in hex><hex string>
     - e.g. To print the DESE logo click on the following link:
 PrintDESElogo
By DESE MTech-2014
Recent Comments